- Export settings decide whether hours of editing survive the trip to the viewer's screen.
- H.264 in MP4 remains the safest universal default; H.265 saves space when you control playback.
- Platforms re-compress every upload, so export above your final target quality.
- Match resolution, frame rate, and color space to your timeline — never convert at export.
Export is the least glamorous stage of editing and the one that quietly ruins the most work. A carefully paced, beautifully graded edit can arrive on a viewer's screen soft, banded, or washed out purely because of choices made in the export dialog. The frustrating part is that these settings are rarely explained — most tutorials say "use the YouTube preset" and move on, which leaves you helpless the moment a client asks for a broadcast file or your upload looks worse than your timeline. This guide explains what each setting actually does, so you can make deliberate choices for any destination. It builds on the fundamentals in our video editing basics guide.
The Export Pipeline Explained
Understanding why exports degrade requires understanding what happens to your file after you click render. Your timeline is uncompressed or lightly compressed source material. Export compresses it into a delivery file using a codec. Then — and this is the step most creators forget — the platform you upload to compresses it again, into whatever format its players use. Viewers never see your export; they see a second-generation copy of it.
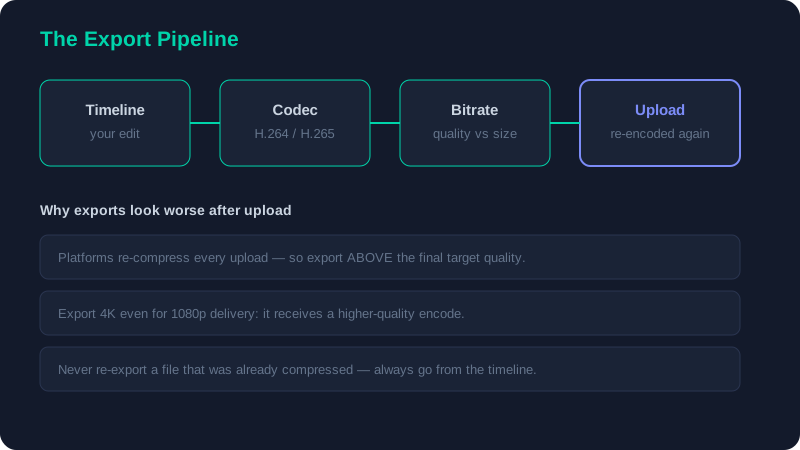
This has one practical consequence that governs almost every decision below: export better than you need. A generous bitrate and a clean, high-resolution source give the platform's encoder more information to work with, and the final result viewers see is visibly sharper.
Codecs and Containers
A codec is the compression method; a container is the file wrapper that holds the video, audio, and metadata. People conflate them constantly, but MP4 is a container while H.264 is a codec that usually lives inside it.
Which codec to choose
| Codec | Strength | Use it for |
|---|---|---|
| H.264 (AVC) | Universal compatibility | Web uploads, client review, general delivery |
| H.265 (HEVC) | Same quality, roughly half the size | 4K archives, limited bandwidth, controlled playback |
| ProRes / DNxHR | Near-lossless, edit-friendly | Masters, broadcast delivery, round-tripping |
| AV1 | Excellent efficiency, royalty-free | Streaming-first workflows where support exists |
For the overwhelming majority of creators, H.264 in an MP4 container remains the correct default in 2026. It plays everywhere, every platform accepts it, and the quality at a sensible bitrate is indistinguishable from more modern codecs at normal viewing distances. Keep a ProRes or DNxHR master of important projects for archiving, because re-exporting from a compressed file compounds quality loss.
Bitrate: Quality Versus File Size
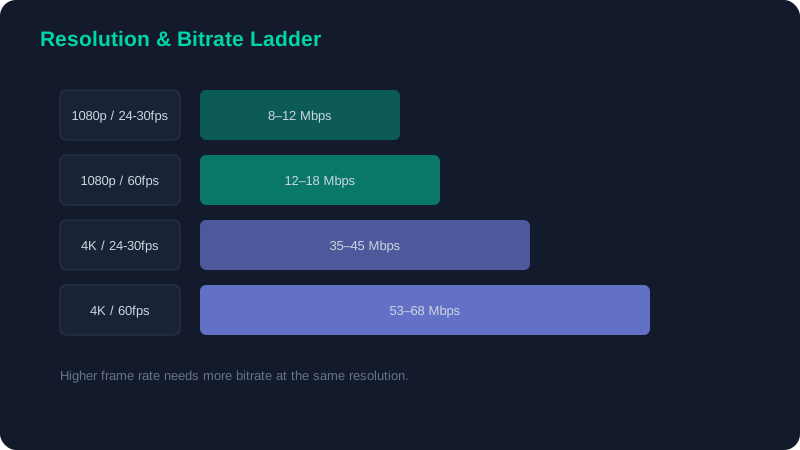
Bitrate is the amount of data used per second of video, and it is the single biggest lever on visual quality. Too low and you get blocking in shadows, mushy detail in motion, and banding across gradients like skies. Too high and you produce enormous files with no visible benefit.
CBR versus VBR
Constant bitrate (CBR) uses the same data rate throughout the video, which is predictable but wasteful — a static talking-head shot gets the same data as a fast action sequence. Variable bitrate (VBR) allocates data intelligently, giving complex motion more and simple scenes less. For final uploads, two-pass VBR produces the best quality per megabyte, because the first pass analyses the footage before the second pass encodes it. The only cost is a longer render, which is easily absorbed by exporting in the background or overnight, as covered in our faster editing workflow guide.
Resolution and Frame Rate
The rule here is simple and rarely broken by professionals: match your timeline. If you edited a 24fps 1080p timeline, export 24fps 1080p. Changing frame rate at export forces the encoder to invent or discard frames, producing judder or an artificial smoothness that viewers register as "off" even if they cannot name why.
Resolution has one useful exception. Exporting and uploading in 4K, even for content shot and finished at 1080p, often results in a better-looking stream, because platforms allocate higher-quality encoding to 4K uploads. If your source is genuinely 1080p, upscaling is a judgement call — it can help the encode but will not add real detail. Test it on your own channel before adopting it as a habit.
Never re-export from a file you already compressed. Every generation of compression compounds artefacts. If a client asks for a revision, go back to the project timeline and export fresh — it takes the same time and the quality difference is visible.
Color Space and Gamma
Mismatched color tags are the most common cause of the "it looked right in my editor but washed out online" problem. For standard web delivery, work and export in Rec. 709 with standard gamma. This is what every platform and browser expects, and staying inside it avoids nearly all color surprises.
HDR is worth the complexity only if you shot in a log or RAW format, graded specifically for HDR on a capable display, and are delivering to a platform and audience that support it. Exporting an HDR-tagged file for standard viewers produces flat, grey-looking video on most screens. If you are grading with the node workflow from our advanced techniques guide, confirm your project color management is set to Rec. 709 before you export, not after.
Audio Export Settings
Audio settings are simpler but still worth getting right. Export AAC at 320 kbps, 48 kHz, in stereo for virtually all web delivery. Check your loudness before exporting: most platforms normalise to around -14 LUFS integrated, so mixing far louder than that achieves nothing except reduced dynamic range after normalisation. Peaks should sit below -1 dBTP to avoid clipping introduced by the platform's own encoding.
If your video includes music beds and voiceover, verify the balance one final time on the exported file rather than the timeline — the mix you hear during editing is not always identical to the encoded result, particularly if any loudness processing is applied at export.
Platform-Specific Settings
| Destination | Codec / container | Recommended settings |
|---|---|---|
| YouTube (long-form) | H.264 / MP4 | Native res & fps, VBR 2-pass, AAC 320 kbps |
| YouTube Shorts | H.264 / MP4 | 1080×1920 vertical, same bitrate ladder |
| Client review | H.264 / MP4 | 1080p, moderate bitrate for fast download |
| Broadcast / agency | ProRes 422 HQ / MOV | Exact spec sheet from the client, no exceptions |
| Personal archive | ProRes or H.265 | Highest practical quality you can store |
For Shorts and other vertical content, the framing rules matter as much as the codec — our YouTube Shorts editing guide covers safe zones and caption placement in detail. Platform requirements do change, so confirm current specifications in the official YouTube Help Center before an important delivery.
The Pre-Export Checklist
Run through this every time. It takes two minutes and prevents the vast majority of delivery problems.
- Timeline settings correct — resolution, frame rate, and color space match your source.
- Audio levels checked — dialogue consistent, peaks below -1 dBTP.
- Full timeline selected — no accidental in/out points cropping your export.
- Correct range rendered — check the export duration matches your edit.
- Codec and bitrate set — H.264, VBR two-pass, appropriate for the resolution.
- Watch the exported file — start to finish, in a normal player, before uploading.
That last step is the one people skip and regret. Export can occasionally introduce problems that never appeared on the timeline — a missing render, a dropped audio track, an unrendered effect. Watching the actual deliverable is the only way to catch them.
Export settings are not glamorous, but they are the final gate between your work and your audience. Get the codec, bitrate, resolution, and color right and your videos will look exactly as you intended on every screen. If you are still building your foundation, work through the editing basics guide first, and when you want to speed up the whole process from edit to upload, see our workflow system for editing faster.