- Multimedia editing means treating footage, motion graphics, and sound as one layered composition.
- A consistent grid, type scale, and small color system keeps graphics looking designed, not pasted on.
- Layering and ducking audio is what lets voice, music, and effects coexist cleanly.
- Building in a fixed order — voice, footage, music, graphics — makes revisions far faster.
"Multimedia" video editing is the craft of combining recorded footage with motion graphics, on-screen text, music, and sound design into a single cohesive piece. It is the difference between a raw clip and the explainer videos, online course lessons, and brand films that people actually remember and share. Where basic editing joins clips together, multimedia editing builds a layered experience where every element supports the others. This tutorial walks through a repeatable multimedia workflow you can apply to any project, extending the core editing basics with the design and audio layers that make content feel genuinely finished.
Think in Layers, Not Clips
Beginners edit clips end to end, one after another. Multimedia editors think in stacked layers that play at the same time: footage on the bottom, graphics and text above it, a music bed underneath everything, a voice on top of the music, and sound effects punctuating the action. Each layer has a single job, and the craft lies in how they interact — a graphic that animates in at the exact frame a whoosh effect peaks, for example, feels far more intentional than either element alone.
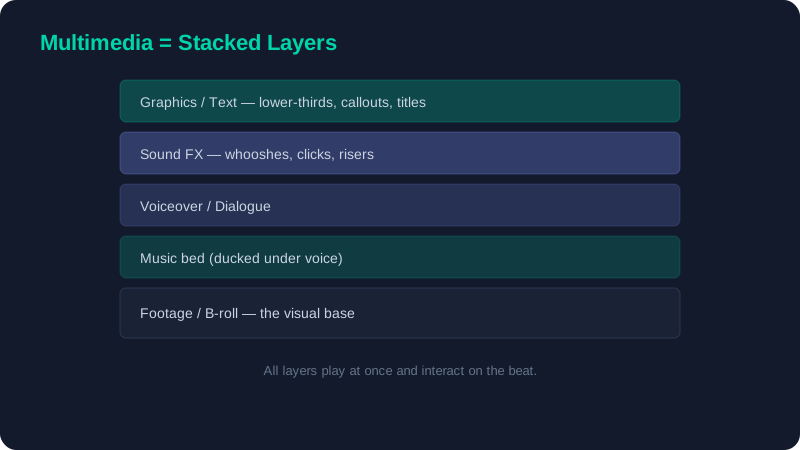
Adopting this mental model changes how you set up a project. Instead of a single video track, you reserve tracks deliberately: one or two for footage and b-roll, one for graphics, two or three for audio. Naming and color-coding these tracks at the start prevents the tangled timeline that makes multimedia projects painful to revise later.
Motion Graphics and Lower-Thirds
You do not need to be a dedicated motion designer to add professional graphics. Three reusable elements cover the vast majority of needs across explainers, tutorials, and brand videos.
The three graphics you will reuse forever
- Lower-thirds: name-and-title bars that animate in from the lower-left to introduce a speaker or label a section.
- Callouts: arrows, circles, and labels that point directly at something on screen — essential for tutorials and product demos.
- Title cards: full-screen section dividers that give long videos a clear structure and a moment to breathe.
Animate every graphic with a short ease-in and ease-out rather than a linear move. That slight acceleration and deceleration is what makes motion feel organic instead of robotic; it is the same easing principle that makes speed ramps feel cinematic in our advanced techniques guide. For more ambitious 3D titles, the free and open-source Blender handles them well, while most timeline editors include more than enough 2D animation for the elements above.
A Type and Color System
The fastest way to make graphics look amateur is inconsistency — three fonts competing for attention, five different sizes, colors picked at random. Define a small system before you start, and your graphics will instantly read as designed.
| Token | Recommendation | Why it matters |
|---|---|---|
| Heading font | One bold sans-serif | Reads clearly at any size, even on a phone screen |
| Body font | Same family, regular weight | Keeps the whole system cohesive and calm |
| Accent color | One brand color plus white | Draws the eye without visual clutter |
| Safe margins | 10% inset from every edge | Nothing important gets cropped on phones or TVs |
| Animation timing | 0.3–0.5s ease in and out | Consistent motion feels like one designed system |
Lock these choices into presets the first time you make them. Every subsequent graphic then inherits the same look automatically, which is both faster and more professional than styling each one by hand.
Sound Design That Supports Picture
Sound is at least half of multimedia, yet it is the layer beginners most often neglect. Good sound design does not call attention to itself; it quietly reinforces what is on screen. A soft riser under a reveal builds anticipation, a subtle click as text appears makes the graphic feel tactile, and a low ambient bed under an interview removes the sterile silence that makes amateur videos feel hollow.
Build a small personal library of clean, royalty-safe effects — whooshes, clicks, risers, impacts, and ambient beds — and reuse them. Consistency in your sound palette does the same job as consistency in your type system: it ties the whole piece together and signals craft.
Mixing with Ducking
The single technique that makes a layered mix feel intentional rather than crowded is ducking — automatically lowering the music whenever the voice speaks, then raising it again in the gaps. Without ducking, music and voice fight for the same space and the result feels muddy and tiring.
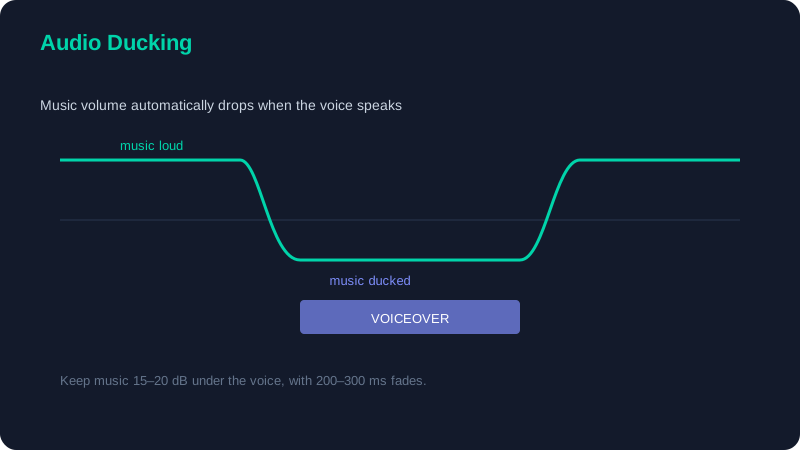
Keep music beds roughly 15–20 dB below your voiceover, and add a 200–300 ms fade whenever the music ducks. An instant volume jump is far more noticeable — and more jarring — than the music simply being quiet, so the smoothness of the transition matters as much as the level.
Assembling the Multimedia Timeline
Bring everything together in a fixed order so projects stay organised and fast to revise. Working out of order — adding graphics before the cut is locked, for instance — means redoing work every time the edit shifts.
- Lock the voiceover or narration first. It is the spine; everything else is timed to it.
- Lay footage and b-roll to match the narration, cutting on the natural beats of the speech.
- Add the music bed and set up ducking against the voice track.
- Layer graphics last so they animate on the beats you have already established.
- Add sound effects to punctuate graphic animations and transitions.
Locking the cut before adding graphics is the most important discipline here. Graphics are the most time-consuming layer to move, so they go on only once the timing beneath them is final.
Build a Reusable Template
The real payoff of a systematic approach is speed on your second project. Save your lower-third, callout, and title-card animations as presets or template clips; save your sound-effects library in a labelled bin; save your export settings. Your second multimedia video should take roughly half the time of your first, and your tenth should feel almost mechanical to assemble — freeing your attention for the creative choices that actually differentiate your work.
Multimedia editing rewards consistency and planning more than raw effort. Get the layers, the type system, and the audio mix right, and even a simple talking-head video starts to feel like a produced piece. To sharpen the cutting itself underneath all these layers, continue with our advanced editing techniques, and if you are publishing to YouTube, the YouTube editing guide shows how to adapt this workflow for watch time.